Krucial Connected Seafarm sensors
Connected Seafarm sensors that use the Krucial K-Mote include:
| Sensor Model | Function | Measurements |
|---|---|---|
| Aanderaa 4531D | Dissolved Oxygen Sensor | Dissolved Oxygen (mg/L), Temperature (°C), Air Saturation (%) |
| Aanderaa 5819 | Conductivity Sensor | Conductivity (mS/cm), Temperature (°C), Salinity (psu), Sound Speed (m/s), Water Density (kg/m3) |
| Chelsea Technology Trilux | Chlorophyll Sensor | Chlorophyll (ug/L), Turbidity (FNU), Phycoerythrin (ug/L), Temperature (°C), Vin (V), Vref (V) |
Pen installation
You will need (pen)
You will need to source:
- Rope
- Buoy
- Weight (1kg recommended, maximum 5kg on high activity/flow sites)
- Electrical tape (50mm width )
Provided by Krucial:
- Sensor from the list above with Krucial K-Mote connector
- Krucial K-Mote (including solar panel/AC power cable and antenna, see K-Mote for installation)
DO NOT use cable ties for attaching sensor cables to ropes, pens, railings etc., as they cause a strain concentration point which can lead to cable failure.
Pen hardware assembly
Prepare the equipment on dry land prior to deploying on site.
- Take a length or rope long enough to span the pen +4m for tying off.
- Thread the rope through the buoy to the rope's mid-point. Tie one end of the rope around the other, tight to the buoy, and thread back through the buoy again. The buoy should now be fixed in the middle of the rope, with the rope coming out both sides.
- Take a second length of rope that is longer than the desired sensor deployment depth. Thread this though the buoy and tie it back onto itself.
- Tape the sensor to the second length of rope so that the distance between it and the buy is the desired deployment depth. See specifics for taping each sensor type to avoid sensing interference: DO - Aanderaa 4531D , Conductivity - Aanderaa 5819 , Chlorophyll - Trilux.
- Tape the sensor cable to the rope at 0.5m intervals up to the buoy. Thread the cable connector through the loop around the buoy, and continue taping to one of the pen tie-off ends.
- Attach a weight to the end of the rope 1m below the sensor, and trim excess rope.
- Coil up the assembly neatly so that it is easy to unwind on the water. Put in a box to transport to deployment site.
The Krucial K-Mote should be installed on the pen before the sensor is installed.
Installing sensor on pen


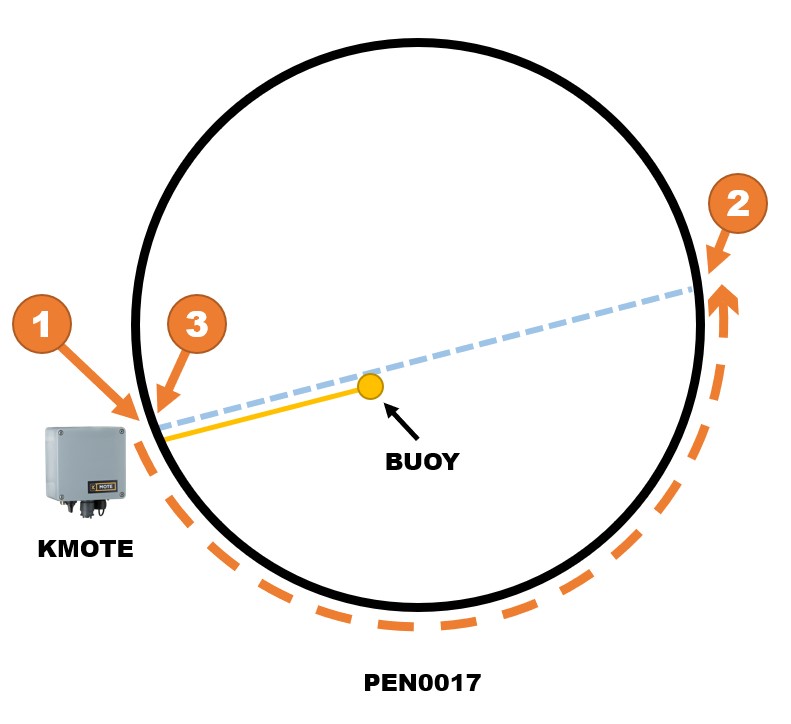
- Take the end of rope with the sensor cable taped to it and tie it to the pen close to the KMote. Note - leave at least 1m extra slack cable between the rope tie-off and K-Mote for strain relief.
-
Walk the other end of the rope around to the opposite side of the pen so that the buoy is held in the middle of the pen with the sensor hanging below it. Tie-off the rope to the pen leaving enough slack to allow for pen movement in sea conditions.

-
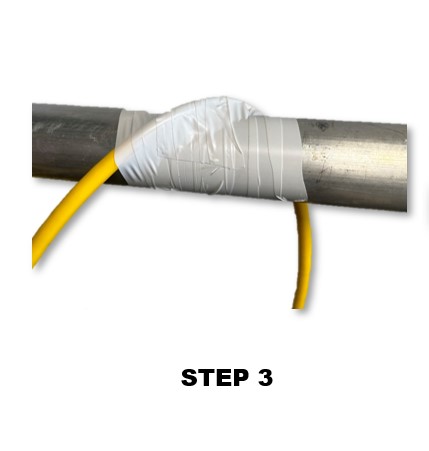
Secure the sensor cable to the pen by wrapping electrical tape around, as shown.

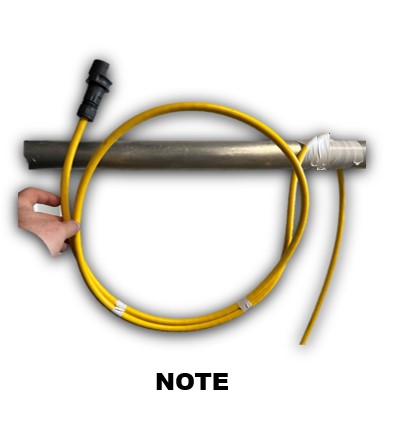
Note - The extra 1m slack for strain relief should be looped and taped loosely between pen and K-Mote, as shown.
Barge installation
Considerations for barge sensor installations
- Install in a location away from risks of damage to the sensor cable, i.e. away from boat moorings. Near feed pipes water entry is usually a good position.
- If the sensor deployment depth does not exceed the barge depth below the surface, the sensor may smash into the side of the barge and be damaged. In such cases another deployment location should be considered, or an offset arm should be used to keep the sensor away from the side of the barge.
- Even if the sensor depth is sufficiently clear of the barge below water, the sensor cable should still not run down the side of the barge, as this will lead to wear and failure of the cable.
You will need (barge)
You will need to source:
- Rope
- Weight (1kg recommended, maximum 5kg on high activity/flow sites)
- Electrical tape (50mm width )
Provided by Krucial:
- Sensor from the list above with Krucial K-Mote connector
- Krucial K-Mote (including solar panel/AC power cable and antenna, see K-Mote for installation)
DO NOT use cable ties for attaching sensor cables to ropes, pens, railings etc., as they cause a strain concentration point which can lead to cable failure.
Barge hardware assembly
Prepare the equipment on dry land prior to deploying on site.
- Take a length of rope, at least 3m longer than the sensor deployment depth + the above water height to the barge tie off point.
- Tape the sensor 1m from the end of the rope. See specifics for taping each sensor type to avoid sensing interference: DO - Aanderaa 4531D , Conductivity - Aanderaa 5819 , Chlorophyll - Trilux.
- Tape the sensor cable to the rope at 0.5m intervals.
- Use a different tape colour to apply a depth marker around the sensor cable, at the desired deployment depth from the sensor.
- Attach a weight to the end of the rope below the sensor.
- Coil up the assembly neatly so that it is easy to unwind on the water. Put in a box to transport to deployment site.
Installing sensor on barge
- Lower the sensor into the water so that the depth marker is at the surface.
- Tie off the rope to the barge so to secure the assembly.
- Secure the sensor cable out of harms way to railings, etc., using electrical tape every 0.5m up to where it meets the K-Mote.
Connecting sensor to K-Mote
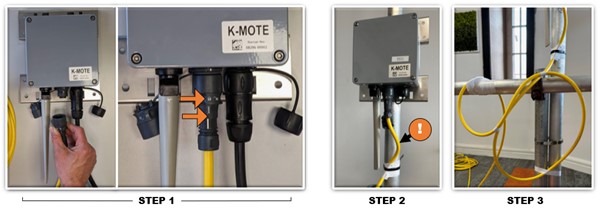
- Connect sensor to K-Mote, and twist locking ring to the right so that it locks in place. Padlock symbol will be in-line with white line when connector is locked. Do not force connector together. If there is resistance, ensure it is correctly orientated.
- Tape sensor cable to K-Mote mounting pole, making sure to leave some slack and not strain the connector, as shown below in "Step 2".
- Ensure cable is clear of walkways and secured, to prevent snagging or damage.
